
An introduction to the iconic OTT plugin
Form a band online, promote your music, buy custom beats, sound parts, and share your Beat or Track as a Royalty Free loop with us. Collaborate to make beats online with the best loop makers from around the world on the Forum for musicians and beat makers. Keep up to date with Music News and learn from FL Studio Video Tutorials and the articles on the Blog. Free DAW Music Software downloads, VST and Instrument Packs for FL Studio, Pro Tools, Logic, Ableton, and how to use the most popular free DAW Software, Fruity Loop Plugins, MIDIs and more.
An introduction to the iconic OTT plugin
Music producers
all around the world, especially in the world of electronic music,
swear by a certain free plug-in created by Xfer Records – the OTT
multiband dynamics processor. It is so popular, in fact, that one
might safely presume that every electronic music producer in the
world uses the OTT, or some version of it, in their day-to-day
workflow.
The OTT didn’t start out as a plug-in, at first. It wasn’t even originally made by Xfer Records. In fact, it was a setting in the dynamics section of the DAW Ableton Live. Originally intended as a processor for mastering, the processor could split a track into three frequency bands, and control the dynamics of each band independently, with extreme precision, using downward and upward compression (a feature which is still a rarity in the plug-in world).
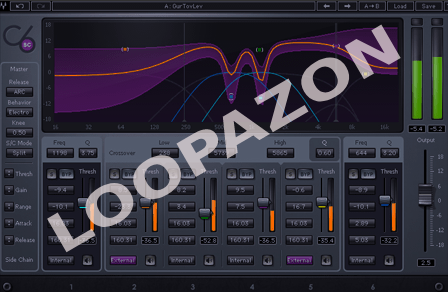
Multiband compression is the process of splitting an audio signal into multiple frequency regions, or bands, and compressing each band separately. When used ‘correctly’, multiband compression can maintain the broad characteristics of a signal and keep it sounding natural, while ironing out wrinkles in dynamic range across the various bands in a surgical, precise way, in order to keep everything sounding consistent. When used ‘incorrectly’, multiband compressors can be powerful tone shapers, and create unique and unexpected sounds from a source. Waves C4 and C6, and FabFilet Pro-MB are great examples of multiband compressors.

Upwards compression is a mirror image to downwards compression. Here, signals whose levels go below a certain threshold are turned up in volume, as opposed to turning down a signal when it goes above a level threshold. This is useful in mastering, because it brings out some of the subtler details of tracks when used in moderation, and can even increase the perceived loudness of a track without increasing peak (or nominal) levels. As a creative tool, upwards compression can be used to bring more clarity to the tonal part of notes, including drum, piano, or guitar sustains, or even room ambiences, and can be used to level out dynamically erratic vocal and string parts. Used excessively, however, upwards compression can increase the noise floor of a signal to a clearly audible amount, so it is recommended to use it carefully and sparingly, or on instruments that have a noise level of virtually zero, like software synths and drum machines. This is one of the reasons that the OTT is so much more popular in electronic productions than it is in productions that involve a lot of analogue equipment. The Waves MV2 is a phenomenal upwards compressor, and so are the UrsaDSP Boost, and Sonnox Oxford Inflator.

OTT stands for ‘Over The Top’, and for good reason. Not only is it a multiband compressor, but each of the three bands can compress upwards as well as downwards simultaneously. As a result, when used properly, the plug-in can deliver seriously precise and musical sounds. But using too much processing, or using it without paying very close attention to minute details can easily make the effect sound over the top, and unmusical. Used too heavy-handedly, this plug-in can ruin the dynamic range of a full mix, or even individual instruments. It is a powerful tool that needs to be used carefully.
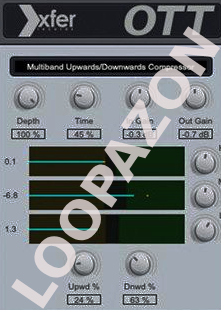
Controls
Let’s
start by taking a look at the Time control. We’ll get to the Depth
control later. The Time control adjusts the plug-in’s time
constants (attack and release). Lowering the control gives you a fast
attack and release, and the resultant processing squashes transients
and brings up the level of tails. It can border on a distortion
effect, rather than compression.

Slower time constants will tend to preserve the transients, and push down the tails a little more, making the sound more percussive and punchy or thuddy than before. Usually, the most musical time constants will be somewhere in between, with snappy sounding transient information, and blooming tails that don’t sound excessively loud and overpowering, but have some movement in time with the groove of the music.
On
the right of the Time control are the input and output gain controls.
These are fairly self explanatory. They determine the level of the
signal entering and leaving the processor. The output control can be
looked at as a wide band make-up gain control as well, to compensate
for peak levels lost during downwards compression.
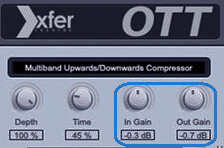
The input gain control can also be crucial to operating this plug-in correctly. The threshold controls, which we shall talk about very soon, work best, and have the highest resolution when they are close to the centre of the threshold window. Setting the input gain correctly allows you to be more precise with the threshold sliders.
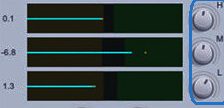
The threshold window lies in the center of the plug-in, with six threshold controls – two for the high band, two for the mid band, and two for the low band. The brown sliders on the left hand side show us the levels at which upwards compression will be applied, and the green sliders on the right hand side show us the levels at which downwards compression will be applied. The black area in between them shows us the levels at which the audio will remain unaffected.
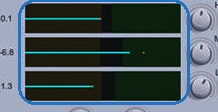
There
are blue lines and yellow dots at the centre of each of the band
threshold sections. When the yellow dot appears on the right of the
blue line, it indicates downwards compression being applied, and when
it is near the edge, or overlapping with the blue line, it indicates
upwards compression being applied. Changing the position of the
threshold sliders can significantly change the tone and level of the
source track, so these sliders are best used in conjunction with the
knobs on the right.
The knobs on the right of the threshold window are make-up gain controls for the individual bands. They, like the threshold sliders, have over 70dB of range, and must therefore be used carefully.
The two controls on the bottom, labelled ‘Upwd %’ and ‘Dnwd %’ are basically ratio controls for each of the processes. This ratio applies to all three bands, so they interact very intimately with the position of the threshold sliders as well.

When
turned all the way down, the ratio goes close to 1:1, meaning almost
no compression happens at all. On the other extreme, turning the
knobs all the way up brings the ratio up a lot, getting very close to
brick wall limiting. Having such a massive range of ratios makes this
compressor extremely versatile, and ratios can be dialled in very
precisely. However, it is for the same reason that the compressor can
be easily overused.
Every control on this plug-in is over the top and extreme, and can lead to imparting detrimental, or even disastrous effects on the audio signal. Therefore, all the controls must be used carefully, with care also being taken to level match processing changes as far as possible. This also brings us to the final control, on the top left of the plug-in – the Depth control.
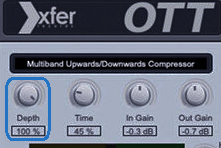
The Depth control acts as a parallel dry/wet mix. Turned all the way to the left, it turns down the level of the processed track completely, and turned all the way to the right, it exclusively puts out the processed signal. Therefore, when processing is overdone it can be reined in, or harnessed to a certain extent, by turning down the Depth control. Depending on the application, the Depth control can be very useful. Sound design processes will, more likely than not, have the depth on 100%, for instance, and mastering or group (or bus) processing will usually require some sort of parallel mix, unless processing has been applied extremely carefully. For a tool as powerful as this, the mix control is an extremely powerful feature, and makes the plug-in a lot more convenient and easy to use.
The OTT is an extremely useable and powerful plug-in, that has become an industry staple, to the extent that synths like Serum, Vital, and Pigments have OTT-style compressors built into them. Slate Digital have even released their take on an OTT plug-in, claiming to improve upon its already powerful features. It is definitely worth taking this plug-in on a test drive, no matter what genre of music or sound design one works with on a regular basis. It is versatile enough to find its zone in pretty much every conceivable scenario.